Tag Archives: Christmas

Glitter Fun Ornament Tutorial

Standard

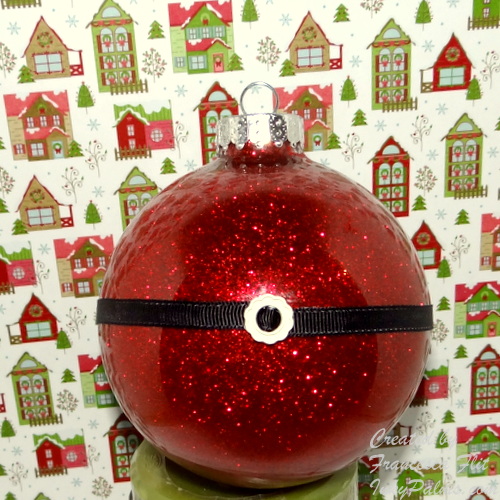
Santa Glitter Ornament

I had some fun yesterday playing with glitter and here is the result!  I think these glitter ornaments are so cute and they are so easy and fun to make.  I bought my large clear glass ornaments at Michael’s, 4 to a pack for $4.49.  And I am happy to say I actually used a coupon, now that I have the coupons on my phone, I always have one!  I added a little grosgrain ribbon and ribbon slider to make this one a santa.  These ornaments are really easy to make, so if you have never made one of these, you should give it a try!

Materials List

Clear ornament, can be glass or acrylic

Floor Wax, I used Pledge Future Shine.  You can use the wood or tile and vinyl finish, just make sure it is a finish, not a cleaner.

Glitter, I used ultra-fine

Stampin’ Up! 1/4 inch Basic Black Grosgrain Ribbon

Stampin’ Up! Ribbon Slider (I only had a white one on hand, a gold or bronze one that is not a flower would probably look better!)

Directions

1.  Remove the hanger cap from the ornament, add a little of the floor wax and swirl to coat the entire inside of the ornament.  Try not to get too many bubbles, because this can leave a bare spot.  Drain the excess back into the bottle.

2.  Add the glitter.  I used a small funnel which I wiped with a dryer sheet to keep the glitter from sticking.  You can also use a paper funnel.  Gently turn the glitter inside the ornament to coat the inside, you may need to add more glitter.  Empty the excess glitter back into the container.

3.  Decorate as desired or leave them as is, they are gorgeous even without any decoration!  Let the ornament dry overnight before inserting the hanger back in and you are done.  See, I told you it was easy!
More Christmas Themed Swap Cards

Standard

Here is the next batch of Christmas Themed Swap Cards:

Frosty Friends Christmas

Materials List

Stampin’ Up! Frosty Friends Stamp

Stampin’ Up! Teeny Tiny Wishes Stamp Set

Stampin’ Up! Apothecary Accents Framelits Dies

Stampin’ Up! Real Red Cardstock

Stampin’ Up! Whisper White Cardstock

Stampin’ Up! Fancy Fan Textured Impressions Embossing Folder

Stampin’ Up! Stamping Sponge

Stampin’ Up! Basic Black Ink

Stampin’ Up! Pool Party Ink

Stampin’ Up! Real Red Ink

Stampin’ Up! Real Red 1/4 inch Grosgrain Ribbon

Stampin’ Up! Word Window Punch

Stampin’ Up! Modern Label Punch

Stampin’ Up! Pumpkin Pie, Pool Party, Lucky Limeade, Real Red Markers

Winter Memories Skates

Materials List

Stampin’ Up! Winter Memories

Stampin’ Up! Real Red Cardstock

Stampin’ Up! Whisper White Cardstock

Stampin’ Up! Polka Dot Parade Real Red Designer Series Paper

Stampin’ Up! Basic Black Ink

Stampin’ Up! Pool Party Ink

Stampin’ Up! Real Red Ink

Stampin’ Up! Apothecary Accents Framelits Dies (Negative for Mask)

Stampin’ Up! Clear Stampin’ Emboss Powder

Stampin’ Up! Lucky Limeade, Real Red Markers

The 3D Paper Bow was made using a Silhouette Cameo Cut File as a Template

Bundle Up! Color Challenge Card

Standard

Bundle Up! Color Challenge Card

Wow, today’s Splitcoaststampers Color Challenge was a challenge with a capital C!  CC385 Real Wonder IslandReal Red, Wisteria Wonder and Island Indigo was a real doozy!  The dessert option was a summer garden, but I just wasn’t seeing it.  As a matter of fact, these colors said winter to me.  They reminded me of a scarf set my son had when he was a toddler, so I went with that theme.  For my card, I used mittens and scarf by Lettering Delights and a Cuttlebug Embossing folder.  The sentiment is part of a stamp by Hero Arts.

Materials List

Stampin’ Up! Real Red Cardstock

Stampin’ Up! Wisteria Wonder Cardstock

Stampin’ Up! Island Indigo Cardstock

Stampin’ Up! Whisper White Cardstock

Stampin’ Up! Island Indigo Marker

Stampin’ Up! Real Red Ink

Stampin’ Up! Wisteria Wonder Ink

Cuttlebug Embossing Folder

Lettering Delights Mittens and Scarf Cut File

Stampin’ Up! 1 1/4 inch Circle Punch

Stampin’ Up! 1 3/8 inch Circle Punch

Stampin’ Up! Scallop Circle Punch


Pretty Pink Baubles Christmas Tree

Standard

Merry & Bright Baubles

My friend Bexx from the 100 in 100 Card Challenge and our new Card-a-Day Blog Group told us about a fun Pinterest Challenge on Apron Strings Designs, so I decided to play along with Pinterest Challenge #15 this week.  Here is the inspiration photo:

Pinterest Challenge #15 Inspiration Photo

I am also submitting this for The Crafter’s Cafe Challenge #6:  Christmas in July – Non-Traditional Colors, Stampin with the Dragon Christmas in July Challenge, and Creatalicious Challenges:  Christmas in July.  The photo reminded me of the Tinsel Christmas Tree we had when I was growing up.  One year , my mom decorated the whole tree in pink, white and silver ornaments.  And that reminded me of the little translucent bubbles that were all the rage a few years back.  I still have several colors of them in jars on my shelf, so I grabbed the pink ones and went to work.  At first I was going to use Stampin’ Up! Snow Swirled for my tree, but then I remembered the Memory Box Winterland Tree Die and decided to try that instead.  I used Stampin’ Up! Brushed Silver for the tree, glued it to a piece of Stampin’ Up! Shimmery White Cardstock, matted in Brushed Silver and used glue dots to adhere the bubble ornaments.  I embossed a piece of Blushing Bride for the background and sponged it with Raspberry Ripple. I stamped the sentiment in Raspberry Ripple, punched with the Stampin’ Up! Lg Oval Punch and matted with the Stampin’ Up! Scallop Oval punched in Raspberry Ripple.  I mounted the sentiment on a piece of Stampin’ Up! Basic Gray Taffeta Ribbon and attached it all to the Raspberry Ripple card base.  I think it is a pretty good representation of that old tinsel tree!

Challenges:

Apron Strings

The Crafter’s Cafe

Stampin with the Dragon

Creatalicious Challenges

Woven Ribbon Wreath Color Challenge Card

Standard

Woven Wreath Color Challenge

Here is another Christmas in July card.  I made this one for today’s Splitcoaststampers Color Challenge CC384 Very Vanilla, Cherry Cobbler and Gumball Green.  The dessert option was to make a Christmas card, so I decided to make a woven ribbon wreath card.  When I was a little girl growing up in Miami, we used to weave palm fronds to make hats, bowls and wreaths.  I don’t know what the technique is called, but you thread loops through loops to make a chain.  I searched the internet and found this video from May Arts which is pretty easy to follow.  For my wreath, I used 1/4 inch Satin Ribbon by Offray.  One little useful tip, I used a 1 3/4 inch circle punch as a base for my wreath to help keep its shape instead of mounting it right on the card.

For my card base, I used Very Vanilla cardstock and the Stampin’ Up! Labels Collection Framelits die.  I folded the cardstock and placed the die so that the fold was just below the cutting edge and ran it through the Big Shot.  I cut another one and adhered it to the front of the card and then trimmed the bottom edge.  I decided to make a Cherry Cobbler frame instead of adding layers.  I used painters tape to hold the dies in place and then ran it through the Big Shot.  I glued the frame to the card base and added the wreath.  I used a 1/8 in circle handheld punch to make the berries and added a little bit of Crystal Effects to give them a little dimension.  I tied the bow with Stampin’ Up! 1/4 inch Bravo Burgandy Ribbon and attached it to the wreath with a glue dot.  The sentiment is from Stampin’ Up! Winter Memories stamped in Cherry Cobbler.


Christmas in July Sparkly Santa Hat

Standard

Sparkly Santa Hat

It’s July, time to start thinking about Christmas!  I usually don’t like to make a bunch of the same card, so I try to make Christmas cards all through the year.  I also like to make Christmas cards with nontraditional colors to spice things up a bit!  I made this card for today’s Splitcoaststampers Featured Stamper FS284 Cynthia aka StampinAK.  I chose her pretty Pink Winter card to case, I love her snowman image and the pink matting.  For my card, I used Raspberry Ripple for my card base and mats.  I stamped the PSX Santa Hat in Basic Black and added Dazzling Diamonds to the cuff and pom pom.  I used Raspberry Ripple and a water brush to color the hat and a Raspberry Ripple marker to add the accents.  I sprayed the image panel with homemade glimmer mist made with Stampin’ Up! Frost White Paint and matted it with a Nestabilities die cut.  I embossed the Whisper White background panel with an embossing folder, sprayed with the glimmer mist and mounted it on the Raspberry Ripple card base.  I stamped the sentiment first in VersaMark, then in Raspberry Ripple, clear embossed and mounted on the card.  This card went together quickly and I love the sparkle from the Dazzling diamonds and glimmer spray!

Believe in Snowflakes

Standard

Believe in Snowflakes!

Today I have a sneak peek for you!  This is a new set from Stampin’ Up!, Snowflake Soiree.  This set is in the new Holiday Catalog, available for order on August 1st.  I don’t think I’ve mentioned before that I am an Independent Stampin’ Up! Demonstrator.  If you are interested in this or any other Stampin’ Up! products, please email me at InkyPalms.com.

For my card, I used today’s Splitcoaststampers Sketch Challenge SC393 and yesterday’s Color Challenge CC383 Raspberry Ripple, Pink Pirouette and Crumb Cake.  I had to substitute Kraft for the Crumb Cake, still catching up on the new colors, but I love the color combo!  I stamped the Pink Pirouette background panel with the smallest snowflake in Raspberry Ripple and mounted on a Kraft card base.  For the Raspberry Ripple triangle panel, I stamped one of the larger snowflakes and the smaller one in Versamark, embossed with white embossing powder and added Dazzling Diamonds.  Unfortunately, the Dazzling Diamonds does not photograph well, but it is really lovely.  I stamped the sentiment in Raspberry Ripple on Pink Pirouette and double matted in Raspberry Ripple and Kraft.  I added a Raspberry, pink and clear rhinestone with glue dots.  What do you think?

Inspired Tropical Wreath

Standard

Soap Inspired Tropical Wreath

This is the card I made for today’s Splitcoaststampers Inspiration Challenge   IC344 ~ Indulgence by SV Soaps and yesterday’s Free for All Challenge F4A124 Wood You Like a Challenge?, to make a card with something related to wood.  This was a fun card to make, but a little time consuming.  I was inspired by the colors in this Island Nectar Soap and this Passionfruit Nectarine Soap.  I used the Palm Frond stamp from Stampin’ Up! Tropical Party to create the wreath.  I punched a small circle to use as a guide and layered the palm fronds stamped in Gumball Green.  I the cut the center with a die a little bigger then the circle punch to clean up the edges and the outside with a die just larger than the wreath.  I stamped shells from several Stampin’ Up! sets, Along the Shore, Stipple Shells and Calm Seas, and colored them with Stampin’ Up! Markers.  I sprayed them with homemade glimmer spray I made using Stampin’ Up! Frost White paint.  When that was dry, I added Crystal Effects and sprayed another coat of glimmer spray.  While the shells were drying, I embossed a piece of  Soft Suede with the Tim Holtz Woodgrain embossing folder, sponged it with Walnut Stain Distress Ink and mounted it on a Gumball Green card base.  I attached the shells to the wreath with Crystal Effects and mounted on the background with Stampin’ Up! Dimensionals.  I stamped the sentiment from Stampin’ Up Christmas Greetings in Calypso Coral, cut with a Nestabilities Banner die, sponged the edges and mounted to the card wih a little pouf in the middle.  This card was a little too time consuming for mass production, but I might make a few more before Christmas.

PSX Christmas Door

Standard

Christmas Door

Today’s challenge on Splitcoaststampers is Ways to Use It Challenge Doors & Windows which I combined with yesterday’s Sketch Challenge for my card today.  I think this PSX Colonial Christmas stamp is the only door or window stamp I have, but I do love it.  I usually stamp it in Brown, but today I decided to emboss it in gold on Very Vanilla cardstock.  I used a water brush and Garden Green to color the wreath and a Real Red marker to color the bow and berries.  The background papers are scraps from a DCWV Christmas stack that I mounted on a Real Red card base.  I cut the banner in Real Red and layered it in top.  I stamped the sentiment from Stampin’ Up! Teeny Tiny Wishes in Real Red on Very Vanilla and punched with a Stampin’ Up! Word Window Punch. I cut the mat with the Memory Box Bistro Label Punch and a scrap piece of textured green cardstock.  I like this layout but I wish I had gold cardstock to layer under the banner and background panel.

PSX Victorian Santa Christmas Tag Inspiration Challenge

Standard

Today’s challenge on Splitcaoststampers is  Inspiration Challenge SC340 ~ Artful Whimsy.  They have some really cute pendants and I chose this Old Time Santa Clause as my inspiration for my Victorian Santa Tag:


I love this PSX Victorian Santa and will probably use him for some of my Christmas cards this year.  For my tag, I colored the image with Stampin’ Up! markers and sponged around the image with Apricot Appeal and Sage Shadow.  I then sponged the whole image with Vintage Photo and the edges with Walnut Distress Inks.  I cut the ovals with Nestabilities dies, using Chocolate Chip and Bravo Burgundy for the mats.  I punched two 1/2 circles with a Stampin’ Up! circle punch to reinforce the hole for the cording.  I used a Stampin’ Up! hand held punch for the hole and threaded it with Stampin’ Up! Gold Elastic Cord.