Tag Archives: SUO

Monogram Background Cut

Standard


Monogram Background Cut

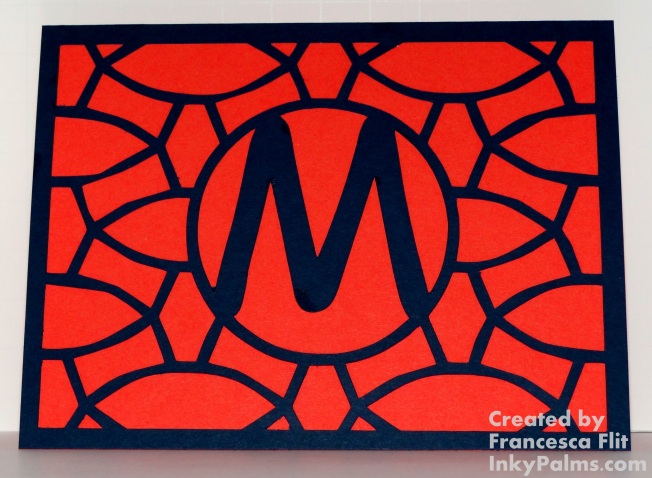
This design is my sample for The Paper Cabana Challenge #4:  Backgrounds.  This was designed to go on a glass block which unfortunately did not arrive in time for the challenge, so plan B was this card.  I used part of the Curve Screen  background by Jennifer Wambach and then welded it to a frame.  I then made the circle frame and welded the letter M inside the frame.  I made an offset of the circle frame to cut out the center of the background and then welded the monogram to the background.  I can’t wait for my glass blocks to get here so I can finish my real project!

Materials List 

Stampin’ Up! Night of Navy and Tangerine Tango Cardstock

Curve Screen by Jennifer Wambach Cut File

Comic Sans TTF
Halloween Lantern

Standard

Halloween Lantern


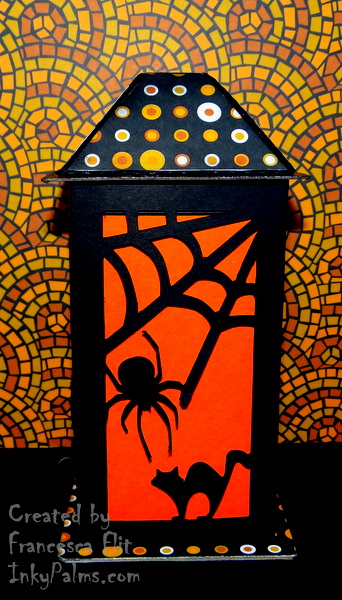
I am on a Halloween roll!  I had this lantern template in my stash and decided to recreate it in Silhouettes Studio.  I added the cobweb, spider and spooky cat to make it a Halloween Lantern.  I think I will make a few more of these to line my walkway on Halloween, just need to add a little orange tissue paper and some battery-powered tea lights!


Materials List

Halloween Lantern Cut File

Stampin’ Up! Basic Black, Tangerine Tango Cardstock and Designer Series Paper

Stampin’ Up! Basic Black Ink

Chipboard from back of paper pad


Happy Halloween Frankie

Standard

20120915-170643.jpg

It is swap time again for my Stampin’ Up! Demo Group, Pineapple Inkers! This month we are doing 3D projects and this little acetate box is my first project. This little box goes together quickly and easily, perfect for a last minute gift!

Materials List

Acetate Treat Box Cut File

Stampin’ Up! Tangerine Tango Cardstock
Stampin’ Up! Basic Black Cardstock
Stampin’ Up! Lucky Limeade Cardstock
Stampin’ Up! Teeny Tiny Wishes Stamp Set
Stampin’ Up! Word Window, Modern Label, Curvy Label, Scallop Circle, Circle and Handheld Circle Punches
Wild Wasabi Stitched Ribbon
Acetate

More Christmas Themed Swap Cards

Standard

Here is the next batch of Christmas Themed Swap Cards:

Frosty Friends Christmas

Materials List

Stampin’ Up! Frosty Friends Stamp

Stampin’ Up! Teeny Tiny Wishes Stamp Set

Stampin’ Up! Apothecary Accents Framelits Dies

Stampin’ Up! Real Red Cardstock

Stampin’ Up! Whisper White Cardstock

Stampin’ Up! Fancy Fan Textured Impressions Embossing Folder

Stampin’ Up! Stamping Sponge

Stampin’ Up! Basic Black Ink

Stampin’ Up! Pool Party Ink

Stampin’ Up! Real Red Ink

Stampin’ Up! Real Red 1/4 inch Grosgrain Ribbon

Stampin’ Up! Word Window Punch

Stampin’ Up! Modern Label Punch

Stampin’ Up! Pumpkin Pie, Pool Party, Lucky Limeade, Real Red Markers

Winter Memories Skates

Materials List

Stampin’ Up! Winter Memories

Stampin’ Up! Real Red Cardstock

Stampin’ Up! Whisper White Cardstock

Stampin’ Up! Polka Dot Parade Real Red Designer Series Paper

Stampin’ Up! Basic Black Ink

Stampin’ Up! Pool Party Ink

Stampin’ Up! Real Red Ink

Stampin’ Up! Apothecary Accents Framelits Dies (Negative for Mask)

Stampin’ Up! Clear Stampin’ Emboss Powder

Stampin’ Up! Lucky Limeade, Real Red Markers

The 3D Paper Bow was made using a Silhouette Cameo Cut File as a Template

Woven Ribbon Wreath Color Challenge Card

Standard

Woven Wreath Color Challenge

Here is another Christmas in July card.  I made this one for today’s Splitcoaststampers Color Challenge CC384 Very Vanilla, Cherry Cobbler and Gumball Green.  The dessert option was to make a Christmas card, so I decided to make a woven ribbon wreath card.  When I was a little girl growing up in Miami, we used to weave palm fronds to make hats, bowls and wreaths.  I don’t know what the technique is called, but you thread loops through loops to make a chain.  I searched the internet and found this video from May Arts which is pretty easy to follow.  For my wreath, I used 1/4 inch Satin Ribbon by Offray.  One little useful tip, I used a 1 3/4 inch circle punch as a base for my wreath to help keep its shape instead of mounting it right on the card.

For my card base, I used Very Vanilla cardstock and the Stampin’ Up! Labels Collection Framelits die.  I folded the cardstock and placed the die so that the fold was just below the cutting edge and ran it through the Big Shot.  I cut another one and adhered it to the front of the card and then trimmed the bottom edge.  I decided to make a Cherry Cobbler frame instead of adding layers.  I used painters tape to hold the dies in place and then ran it through the Big Shot.  I glued the frame to the card base and added the wreath.  I used a 1/8 in circle handheld punch to make the berries and added a little bit of Crystal Effects to give them a little dimension.  I tied the bow with Stampin’ Up! 1/4 inch Bravo Burgandy Ribbon and attached it to the wreath with a glue dot.  The sentiment is from Stampin’ Up! Winter Memories stamped in Cherry Cobbler.


Blossom Punch Hibiscus Challenge Card

Standard


Here is my entry for this week’s challenge at The Paper Players,  Challenge #103 – Colors from Anne Marie.  I love this summery color combo and my first thought when I saw it was flowers.


Calypso Hibiscus Thank You

I made the Hibiscus flowers using the Stampin’ Up! Blossom Punch.  I punched three flowers in Calypso Coral and cut the petals apart.  I sponged the edges and centers with Calypso Coral and added a few lines with the Calypso Coral Marker.  I glued five petals to a 1/2 inch circle base and added a flower from the Stampin’ Up! Spring Bouquet Punch.  I punched the centers in Daffodil Delight and sponged with Daffodil Delight to add a little definition.  For the leaves, I used the brand new Bigz Die Autumn Accents from the Stampin’ Up! Holiday Catalog.  I cut the leaves in Lucky Limeade, used a bone folder to create the veins and sponged with Lucky Limeade.  For the background panel, I embossed a piece of Daffodil Delight with the Stampin’ Up! Fancy Fan Embossing Folder.  I mounted the background panel on a Calypso Coral card base.  I adhered the leaves and flowers and then added the sentiment.  I stamped the Stampin’ Up! Itty Bitty Banners sentiment in Lucky Limeade on Whisper White, cut it out by hand and layered on the mat I cut with the new Stampin’ Up! Framelits Bitty Banners in Calypso Coral.  I must say, I am really pleased with how this turned out!

Believe in Snowflakes

Standard

Believe in Snowflakes!

Today I have a sneak peek for you!  This is a new set from Stampin’ Up!, Snowflake Soiree.  This set is in the new Holiday Catalog, available for order on August 1st.  I don’t think I’ve mentioned before that I am an Independent Stampin’ Up! Demonstrator.  If you are interested in this or any other Stampin’ Up! products, please email me at InkyPalms.com.

For my card, I used today’s Splitcoaststampers Sketch Challenge SC393 and yesterday’s Color Challenge CC383 Raspberry Ripple, Pink Pirouette and Crumb Cake.  I had to substitute Kraft for the Crumb Cake, still catching up on the new colors, but I love the color combo!  I stamped the Pink Pirouette background panel with the smallest snowflake in Raspberry Ripple and mounted on a Kraft card base.  For the Raspberry Ripple triangle panel, I stamped one of the larger snowflakes and the smaller one in Versamark, embossed with white embossing powder and added Dazzling Diamonds.  Unfortunately, the Dazzling Diamonds does not photograph well, but it is really lovely.  I stamped the sentiment in Raspberry Ripple on Pink Pirouette and double matted in Raspberry Ripple and Kraft.  I added a Raspberry, pink and clear rhinestone with glue dots.  What do you think?

Friends on the Hill, a Silhouette Technique Challenge

Standard

Friends on the Hill

Today’s Technique Lovers Challenge on Splitcoaststampers is to create a silhouette by stamping on dark cardstock.  You can also use a die or cut an image out.  For my card, I started with a piece of Cool Caribbean cardstock.  I cut two pieces of green Stampin’ Up! Designer Series Paper for the hills, using a French Curve as a guide and glued them to the base.  I cut the Memory Box Cloud, outlined them with a Copics Cool Gray marker and gued them down.  I used the Memory Box Orchard Frame die for my tree silhouette, cut it in dark brown Stampin’ Up! Designer Series Paper and trimmed away the frame and some of the ends of the branches to shape it up.  I glued it to the background, then mounted the background on a Certainly Celery card base.  For the bunnies, I stamped the bunny from Stampin’ Up! Forest Friends on the wrong side of a piece of scrap Stampin’ Up! Designer Series Paper.  I cut the bunny out, flipped him over, traced him on the back of the paper and cut him out again.  I mounted my little bunny friends with Stampin’ Up! Dimensionals.  I stamped the sentiment from Stampin’ Up! Garden Greetings in Old Olive on Whisper White and matted it in Old Olive.  I punched both with Stampin’ Up!  Oval Punches and mounted with Dimensionals for a quick little card!

Inspired Boston Terrier

Standard

Backpack Inspired Boston Terrier

When I saw this adorable backpack on today’s Splitcoaststampers Inspiration Challenge site, I just had to make a card with him!  My daughter is an athlete at Boston University and their mascot is a Boston Terrier, how could I not!  I paper pieced my Boston using the Stampin’ Up! Sizzix Top Note die for the base.  I cut one in black and one in white and did a little trimming.  I used Stampin’ Up Wide Oval and Large Oval for the bottom and Stampin’ Up Sizzix Ovals die which I trimmed for the ears.  I had these XL googly eyes in my stash and they were a perfect fit!  I used a Signo White Gel Pen for the accents under the eyes and mounted him to a Real Red card base cut tent style.  Isn’t he cute!

Aside

I made this card last summer and it is one of my favorite cards that I have made.  When I first saw the Stampin’ Up! Set Inspired by Nature, it immediately reminded me of beach grass on sand dunes.  When I was a young adult, I lived in the Florida Panhandle and the sunsets there were magnificent. I loved to go down to the beach with a picnic dinner and watch the sun set over the bay and this card was inspired by that time in my life.

To make this card, I chose Kraft for the card base and Bermuda Bay for the mat.  Using Whisper White for the image panel, I masked the sun with a circle punch and sponged the sunset sky with Summer Sun and Pumpkin Pie.  I used Bermuda Bay and Baja Breeze for the water and Creamy Caramel for the sand.  I stamped the grass first in VersaMark and then in Creamy Caramel and embossed with clear embossing powder.  I stamped one of my favorite sentiments on a Stampin’ Up! Labels die cut in Creamy Caramel and sponged the edges.  I wrapped the twine around the bottom and mounted the sentiment label on the twine.


Dunes at Sunset, Revisiting a Personal Favorite